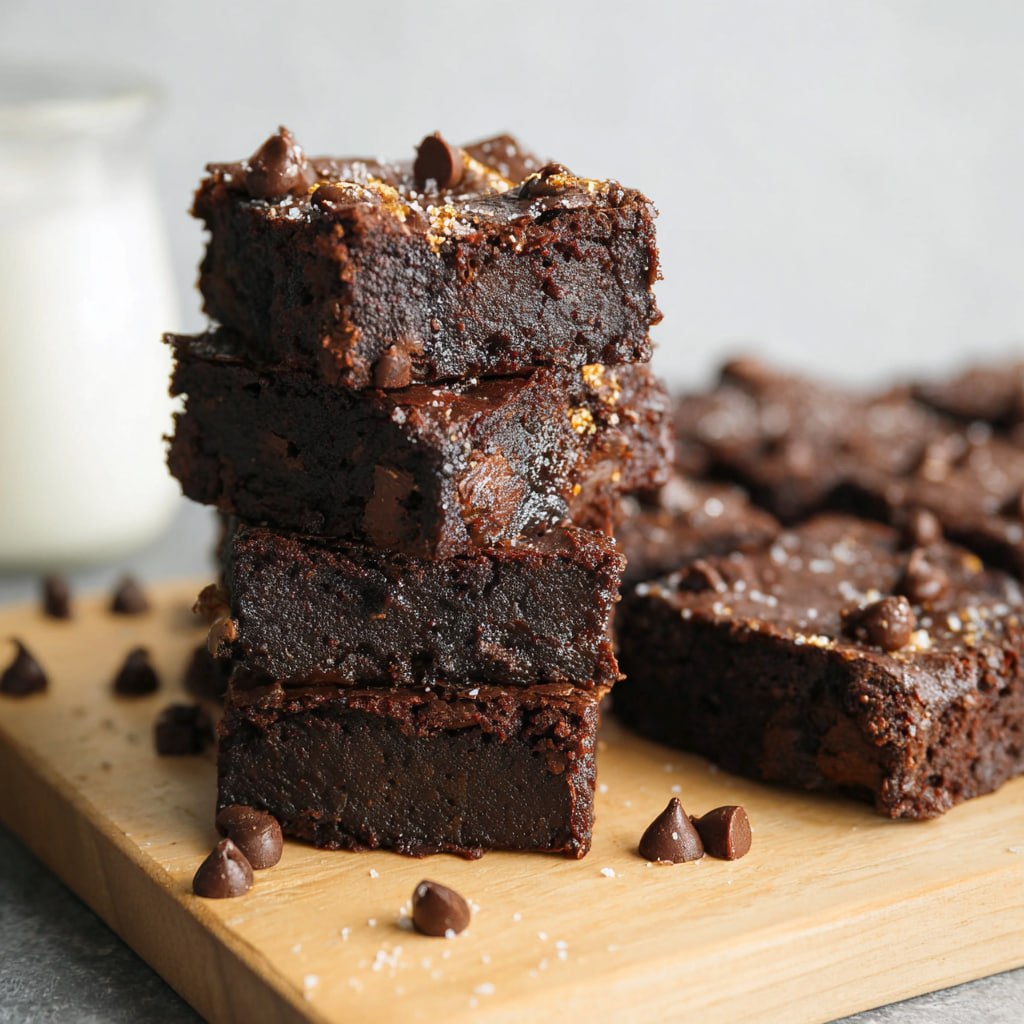
Step-by-Step: How to Make Black Bean Brownies Nobody Can Tell Are Healthy
The entire secret to fudgy black bean brownies that pass the taste test is in two steps: the rinse and the blend. Every failure I’ve seen with this recipe traces back to under-rinsed beans (creating a faint beany off-note) or under-blended batter (leaving detectable bean texture). Master those two steps and you have a foolproof recipe for the most nutritionally dense brownie in your repertoire. Let me walk through every detail.
Ingredients List
- 1 can (15 oz) black beans — drained, rinsed, and patted dry
- 2 large eggs
- 3 tablespoons coconut oil (melted) or unsalted butter
- ¾ cup unsweetened cocoa powder
- ½ cup sugar (or coconut sugar)
- 1 teaspoon vanilla extract
- ½ teaspoon baking powder
- ¼ teaspoon salt
- ½ cup dark chocolate chips
Equipment: Food processor or high-powered blender, 8×8 baking pan, parchment paper, instant-read thermometer (optional but useful).
Timing
- Prep: 10 min | Bake: 25–28 min | Cool: 15 min | Total: 50 min
Step 1 — The Critical Rinse
Open the can and pour beans into a fine-mesh strainer over the sink. Run cold water over them continuously while tossing with your hand for a full 60 seconds — not a quick rinse, a thorough one. The water running off should be completely clear by the end. Shake the strainer to remove excess water, then spread beans onto a clean kitchen towel or paper towels and pat dry. Surface moisture dilutes the batter and weakens the chocolate concentration.
Why this matters: Black bean canning liquid contains starch, salt, and fermentation byproducts that carry the characteristic “bean” smell and taste. These compounds are water-soluble — a thorough rinse removes essentially all of them.
Step 2 — The Complete Blend
Add to your food processor in this order: beans first (bottom), then eggs, oil, vanilla. Add dry ingredients on top (cocoa, sugar, baking powder, salt). Starting with beans on the bottom ensures they get hit first by the blade and begin breaking down before the other ingredients interfere. Process for 90 seconds total. Stop at 45 seconds — use a spatula to scrape the sides and bottom of the bowl — resume for another 45 seconds.
Test for doneness: Scoop a small amount onto a white plate and examine closely under good light. You should see zero visible bean pieces — a completely uniform, glossy chocolate batter. If you see speckles of bean skin, process another 30 seconds and test again.
Step 3 — Pan Prep and Batter Spread
Preheat oven to 350°F. Line your 8×8 pan with parchment paper — cut a piece large enough to hang over two sides (handles for lifting after baking). Lightly spray the exposed sides with cooking spray. Pour batter into the pan. The batter will be noticeably thicker than standard brownie batter — this is correct. Use an offset spatula or the back of a spoon to spread it evenly to the corners. Scatter chocolate chips evenly over the top, pressing lightly so they partially embed.
Step 4 — Bake With Attention to Timing
Bake at 350°F on the center rack. Set your timer for 23 minutes and check: the edges should be pulled slightly away from the pan sides; the center should not visibly jiggle when you gently shake the pan. Insert a toothpick in the center — it should come out with moist, fudgy crumbs attached (not wet batter, not completely clean). If the toothpick comes out wet, bake 2–3 more minutes and check again. Total time: 25–28 minutes depending on your oven.
Do not overbake. Bean brownies have less starch than flour brownies, meaning they dry out faster once past the optimal point. The brownies will look slightly underdone in the center when you pull them — they will firm up during cooling.
Step 5 — Cool and Cut for Perfect Squares
Remove from oven. Do not cut, do not move to a rack yet. Leave the pan on the counter for 10 minutes — the pan’s residual heat continues cooking the bottom while the top cools. After 10 minutes, grasp the parchment overhangs and lift the brownie slab onto a cutting board. Cool 5 more minutes. Cut with a sharp knife in a single downward motion (don’t drag). Wipe the knife blade clean between every cut. This produces clean, sharp-edged squares that look bakery-quality.
Nutritional Information
Per square (1 of 16): Calories: 95 | Protein: 3.5g | Fat: 4g | Fiber: 2.5g | Sugar: 8g
Healthier Alternatives
- Vegan: flax eggs (1 tbsp ground flax + 3 tbsp water, rest 5 min before using)
- No refined sugar: 3 mashed ripe bananas replace all sugar
- Keto: erythritol or allulose instead of sugar
- Extra protein: 2 tbsp unflavored collagen blended into batter
Serving Suggestions
- Room temp with cold milk — the classic
- Warm (20 sec microwave) with vanilla ice cream
- Cold from the fridge — dense, fudgy, almost like chocolate truffle
- Crumbled over plain Greek yogurt with banana
Common Mistakes to Avoid
- Quick rinse (30 sec) — not enough; bean flavor survives
- Under-blending — always test with white plate visual check
- Cutting while warm — structure not set; brownies fall apart
- Baking past 28 minutes — they dry out rapidly
Storing Tips
- Counter (airtight): 3 days | Fridge: 1 week | Freezer: 3 months individually wrapped
- Best texture: day 2 after refrigeration overnight
Conclusion
Black bean brownies done right are indistinguishable from traditional brownies — the rinse and the blend are everything. Follow these five steps precisely and you’ll have a batch of fudgy, chocolatey, secretly nutritious brownies that nobody can identify. Try them this week and tell us in the comments whether anyone guessed the secret ingredient!
FAQs
Q: Why did my brownies come out dry?
A: Overbaking is almost always the cause. Pull at 25 minutes and check — they should look slightly underdone in the center. They firm up as they cool.
Q: Can I use a blender instead of a food processor?
A: Yes — a high-powered blender (Vitamix, Ninja) works well. A standard blender may struggle; if so, blend in two batches or add 1–2 tbsp water to help the blades catch.
Q: Can I make these without any oil?
A: The oil contributes to fudgy texture and moisture. You can reduce to 2 tbsp but going lower produces a noticeably drier result. Unsweetened applesauce (3 tbsp) is a reasonable fat-free substitute.
Q: How can I tell when they’re done without a toothpick?
A: The edges will be visibly set and slightly pulled from the pan. The center will not jiggle when gently shaken. The top will look matte (not wet/shiny). These visual cues together indicate doneness.
Q: Can I add nuts?
A: Yes — fold ½ cup chopped walnuts or pecans into the batter before spreading, or press onto the top before baking. They add texture contrast and healthy fats.