The Technique Behind Perfect Baked Cheeseburger Sliders — What Most Recipes Get Wrong
Most cheeseburger slider recipes tell you to put beef on rolls, add cheese, and bake. That’s technically correct but misses the three technique decisions that separate good sliders from great ones: beef fat management (too much fat = soggy rolls), the connected-bake method (individual rolls dry out), and the butter glaze composition (the reason the tops taste so good). This step-by-step guide covers easy cheeseburger sliders in full technical detail — so you understand not just what to do, but exactly why each step matters and what happens if you skip it.
Ingredients List
- 1 lb (450g) ground beef, 80/20 fat ratio
- 12-count Hawaiian sweet rolls (King’s Hawaiian brand, or equivalent)
- 6 slices American cheese (or cheddar, provolone, or pepper jack)
- ½ cup yellow onion, finely diced
- 1 tsp garlic powder, 1 tsp Worcestershire sauce, salt and pepper
- Butter glaze: 3 tbsp unsalted butter (melted), 1 tsp garlic powder, 1 tsp Worcestershire sauce, 1 tsp Dijon mustard, 1 tsp sesame seeds
- Condiments: pickles, ketchup, yellow mustard, special sauce
Equipment: 9×13 inch baking dish, large skillet, long serrated knife, pastry brush, aluminum foil.
Timing
- Prep: 10 min | Cook beef: 8 min | Bake: 20 min | Rest: 3 min | Total: ~41 min
Step 1 — The Beef: Why 80/20 and How to Cook It Right
Use 80/20 ground beef (80% lean, 20% fat). The fat ratio matters: 80/20 produces juicy, flavorful beef that seasons the surrounding rolls during baking. 90/10 beef is leaner and requires heavier seasoning to compensate for reduced fat flavor. 70/30 is too greasy — you’ll end up with soggy rolls no matter how much you drain.
Heat a large skillet over medium-high heat — no oil needed, the beef provides its own. Add beef and onion. Break the beef into fine crumbles as it cooks using a spatula or wooden spoon. The goal is uniform, small crumbles: if some pieces are large, they create an uneven layer in the slider and fall out when people eat. Season with garlic powder, Worcestershire, salt, and pepper when the beef is about 70% cooked. Seasoning earlier causes moisture loss; seasoning later means the seasoning sits on the surface rather than integrating into the meat.
The critical fat management step: When fully cooked, tilt the pan and use a spoon to remove as much rendered fat as possible. Then transfer the beef to a colander over a bowl and let it drain for 2 minutes. This two-step drainage removes most of the fat that would otherwise soak the bottom rolls during the 20-minute bake. Soggy rolls are the most common slider failure — proper drainage prevents it entirely.
Step 2 — The Connected-Bake Method
This is the defining technique of slider baking: never separate the rolls before baking. Here’s why it matters:
- Individual separated rolls: Exposed cut surfaces dry out during 20 minutes at 350°F. The bread edges become tough while the center is still soft — uneven texture throughout.
- Connected rolls: The interior surfaces never touch hot oven air. Moisture is retained. Every roll emerges with the same soft, pillowy texture. The rolls also support each other structurally, preventing the beef from causing individual rolls to tip or slide.
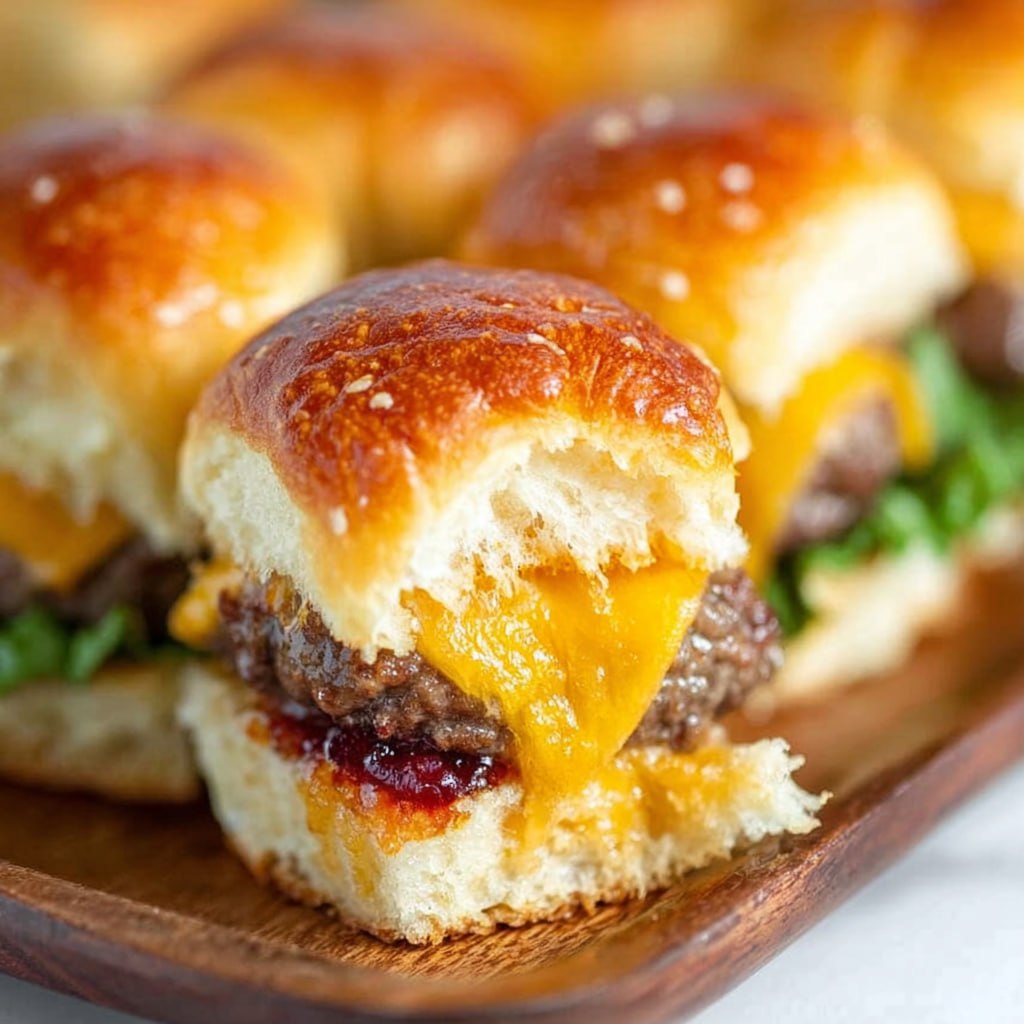
Technique: Remove the rolls from the packaging. Using a long serrated bread knife, saw horizontally through the entire pack as if it’s a single loaf of bread. One continuous horizontal cut through all 12 rolls simultaneously. The top half lifts off as a single piece; the bottom stays together. Place the bottom in a lightly greased 9×13 baking dish.
Step 3 — Layering: Order and Evenness Matter
Spread the drained beef mixture evenly over the bottom rolls. “Evenly” means genuinely even — use a spoon to distribute to every corner and edge. Sliders at the corners get less beef than center sliders if you don’t actively push it there. After beef, lay cheese slices over the beef layer. Overlap slices to cover maximum surface area — as the cheese melts, it needs to reach every slider. A gap in the cheese means a slider without melted cheese.
Place the top roll half over the cheese. Press down gently with your palm — you’re not compressing, just ensuring even contact between the top rolls and the cheese layer below.
Step 4 — The Butter Glaze: Composition and Application
The butter glaze is not optional decoration — it’s a critical flavor and texture component. Here’s what each ingredient contributes:
- Butter: Fat carrier for the other flavors; creates the golden crust; prevents the rolls from drying out in the oven
- Garlic powder: Aromatics that bloom in the butter and penetrate the roll surface
- Worcestershire: Umami depth, slight acidity that cuts through the richness of butter and beef
- Dijon mustard: Emulsifier that holds the glaze together; adds subtle tang that balances the sweetness of Hawaiian rolls
- Sesame seeds: Textural contrast; visual marker of quality
Mix all glaze ingredients and brush generously over the top rolls, including into the crevices between rolls. Use a pastry brush for even coverage — pouring the glaze on creates puddles rather than even coating. Every square inch of the top should be coated.
Step 5 — Bake With Precision
Cover the baking dish tightly with aluminum foil. Bake at 350°F (175°C) for 15 minutes covered. Remove foil and bake 5 more minutes uncovered. The two-phase baking is deliberate:
- Covered 15 min: The steam trapped under the foil melts the cheese completely and heats the beef through without drying the rolls
- Uncovered 5 min: The butter glaze caramelizes slightly, the sesame seeds toast, and the tops achieve a golden, lightly crispy surface
Watch closely in the final 5 minutes — the line between golden and overbrown is narrow with butter-brushed rolls. The tops should be golden, not dark brown.
Step 6 — Rest, Then Slice Clean
Remove from oven and rest 3 minutes. During baking, the cheese becomes very fluid. A 3-minute rest allows it to set slightly — the difference between cheese that flows out when cut and cheese that stays on the slider. Use the same serrated knife to slice along the natural divisions between rolls. Press down gently and saw — don’t push straight down, which compresses the rolls before cutting.
Nutritional Information
Per slider (1 of 12): Calories: 220 | Protein: 12g | Fat: 12g | Carbs: 16g | Sodium: 340mg
Healthier Alternatives
- 90/10 beef saves ~35 calories per slider (season more aggressively)
- Ground turkey: similar texture, lower fat, requires heavier seasoning
- Reduced-fat cheese: saves 20–30 calories per slider
- Olive oil spray on top instead of butter glaze: significantly fewer calories
Serving Suggestions
- Game day spread with chips, coleslaw, and a sauce bar
- Weeknight dinner with sweet potato fries and salad
- Party appetizer — keep in baking dish, guests serve themselves
- Kids’ party — set up a topping bar, let children customize
Common Mistakes to Avoid
- Insufficient fat drainage (soggy rolls every time)
- Separating rolls before baking (dry, uneven texture)
- Skipping the foil cover (tops overbrown, cheese doesn’t melt)
- Cutting immediately from the oven (cheese runs out)
Storing Tips
- Refrigerator: 3 days airtight
- Reheat: oven 325°F 10 min — microwave makes rolls rubbery
- Make ahead: assemble without glaze, refrigerate 24 hrs, glaze and bake when ready
Conclusion
Cheeseburger sliders done right come down to three things: proper beef fat drainage, connected-bake method, and a well-composed butter glaze. Master these and every batch will be the one people talk about. Follow the six steps above and make them for your next gathering — share how they turned out in the comments!
FAQs
Q: Can I make these on a grill instead of in the oven?
A: The connected-bake method requires an oven or covered grill (indirect heat). Place the assembled baking dish on a grill preheated to 350°F with indirect heat (burners off under the dish, on around it). Cover the grill and cook as directed — 15 min covered with foil, 5 min uncovered. The smoke from the grill adds a subtle flavor the oven can’t replicate.
Q: Can I add bacon to these sliders?
A: Yes — cook bacon until crispy, crumble, and add a layer between the beef and cheese. Bacon adds salt, crunch, and smokiness. If adding bacon, reduce the Worcestershire in the beef seasoning slightly to avoid excess saltiness.
Q: My sliders keep coming out soggy — what am I doing wrong?
A: Insufficient fat drainage is almost always the cause. The two-step drainage (tilt pan to remove fat, then drain in a colander) is essential. Also check that you’re covering with foil — the steam under foil creates some moisture, but without foil the cheese steams improperly and liquid accumulates on the rolls.
Q: Can I use any type of roll besides Hawaiian?
A: Martin’s Potato Rolls are excellent — soft, slightly sweet, structurally sound. Brioche slider buns work well. Regular dinner rolls produce a less distinctive result. Avoid whole wheat rolls if feeding a crowd — the texture is denser and the flavor is less complementary to the butter glaze.
Q: How do I scale this for a large party?
A: The recipe scales easily. Use multiple 9×13 baking dishes (one pack of rolls per dish). Bake simultaneously on different oven racks. Rotate the dishes halfway through baking for even browning. For 50+ guests, stagger batches so fresh sliders come out every 20 minutes throughout the party.