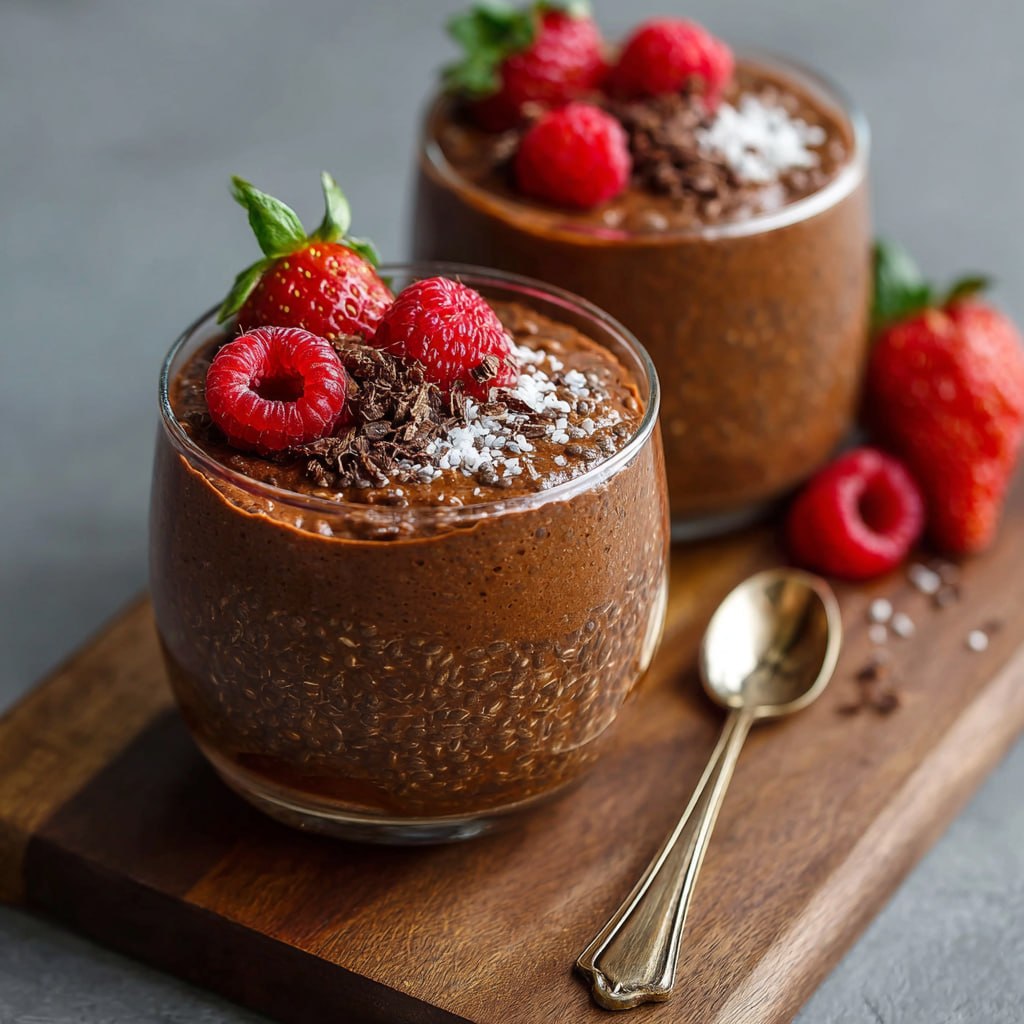
Why Chia Seeds Make the Best No-Cook Chocolate Mousse
The reason chocolate chia mousse works — and works surprisingly well — is a single biological mechanism: chia seeds are coated in mucilage, a soluble fiber that swells dramatically when hydrated, absorbing up to 12 times the seed’s weight in liquid and forming a gel matrix. This gel is what creates the thick, creamy, mousse-like texture that makes people do a double-take when they learn there’s no cream, no eggs, and no cooking involved. Understanding the mechanism means you can troubleshoot any issue and modify the recipe confidently. This step-by-step guide covers everything from the chemistry to the technique.
Ingredients List
- 1.5 cups full-fat coconut milk (canned, well-shaken)
- 3 tablespoons unsweetened cocoa powder (Dutch-process or natural)
- 3 tablespoons pure maple syrup or honey
- 1 teaspoon pure vanilla extract
- 4 tablespoons chia seeds
- Pinch of sea salt
- Toppings: fresh raspberries, dark chocolate shavings, cacao nibs, coconut whipped cream
Equipment needed: Medium mixing bowl, whisk (or blender), measuring cups and spoons, individual serving jars (4 oz or 8 oz mason jars work perfectly), refrigerator space.
Timing
- Active prep: 5 min | Refrigeration: 2–8 hrs | Optimal: overnight (8+ hrs)
Step 1 — Choose and Prepare Your Liquid Base
Open the can of coconut milk and shake or stir before measuring — the fat in coconut milk separates during storage and creates a thick cream layer at the top. If your mousse uses only the cream layer, it will be too rich; only the thin liquid at the bottom, too thin. Shake the can to recombine before opening. If the can is very cold, the fat will be completely solid — run under warm water for 30 seconds, then shake.
Why full-fat matters: The fat content in full-fat coconut milk (17–22%) is what creates the rich, creamy mouthfeel. Light coconut milk has 5–7% fat — the chia gel still forms, but the mousse will have a noticeably thinner consistency and less satisfying richness.
Step 2 — Build a Smooth Chocolate Base
Measure the coconut milk, cocoa powder, maple syrup, vanilla, and salt into a mixing bowl. Whisk for at least 60 seconds. The critical issue with cocoa powder: Cocoa particles are hydrophobic (water-repelling) and form clumps in cold liquid that don’t break down on their own. Every clump in this stage becomes a grainy spot in the final mousse. Solutions:
- Best method: Use an immersion blender for 20 seconds — guarantees a perfectly smooth base
- Standard method: Sift the cocoa powder into the liquid first, then whisk vigorously
- Check: Lift the whisk and let mixture drip back into the bowl — it should flow smoothly with no visible lumps
Taste at this stage. The mixture should be pleasantly sweet with strong chocolate flavor. If it tastes too bitter, add a teaspoon more maple syrup. Once chia seeds are added, the texture makes tasting and adjusting more difficult.
Step 3 — Add Chia Seeds and Execute the Two-Stir Protocol
Add 4 tablespoons of chia seeds to the chocolate base. Stir vigorously for 30 seconds, making sure seeds are distributed throughout the liquid (not all at the bottom). Set a timer for 5 minutes.
At 5 minutes, look at the bowl. You’ll see that chia seeds have sunk and begun gelling in clusters near the bottom. This is normal — and exactly why the second stir is required. Stir again for 20–30 seconds, breaking up all clusters and redistributing seeds evenly throughout the thickening liquid. The mixture will already be noticeably thicker than at the start.
Why two stirs? During the first 5 minutes, seeds are absorbing liquid and expanding rapidly. Stirring at this moment breaks up forming clusters while the gel is still mobile enough to redistribute. Wait longer and the clusters set permanently, creating an uneven texture: dense gel pockets alternating with thin liquid areas.
Step 4 — Portion Into Serving Jars
Pour or spoon the mixture into individual serving jars. Use a pour spout from the bowl if possible — the mixture is still liquid enough to pour at this stage. For 4 servings: use 4-oz jars. For 2 generous servings: use 8-oz jars.
Container choice matters for presentation: Clear glass jars let you see the color and texture through the side. Wipe any drips from the jar rims with a clean cloth before refrigerating — this keeps the presentation clean and prevents the lids from sticking. Seal with lids or cover tightly with plastic wrap.
Step 5 — Refrigerate and Monitor the Set
Refrigerate for a minimum of 2 hours. Here’s what happens at each stage:
- 30 minutes: Mixture is still mostly liquid, seeds visible and floating
- 2 hours: Mixture has gelled into a thick pudding consistency — minimum edible threshold
- 4 hours: Firm, spoonable mousse with clean edges when scooped
- 8 hours (overnight): Maximum firmness — mousse holds its shape completely, deepest flavor
For a dinner party or special occasion, always make this the night before. The improvement between 2 hours and 8 hours is significant.
Nutritional Information
Per serving (half the recipe): Calories: 280 | Protein: 5g | Fat: 18g | Fiber: 10g | Omega-3: 4,500mg | Vitamin A: 2% DV | Calcium: 18% DV
Healthier Alternatives
- Almond milk base: drops to ~160 calories per serving
- Add chocolate protein powder for a high-protein version
- Use monk fruit sweetener for zero-sugar variant
- Raw cacao powder instead of cocoa for maximum antioxidants
Serving Suggestions
- Dinner party: make night before in small mason jars, top with berries before serving
- Parfait: layer with granola and banana
- Frozen popsicles: pour into molds and freeze for 4 hours
- Post-workout: add protein powder for a recovery dessert
Common Mistakes to Avoid
- Skipping the second stir (causes uneven texture every time)
- Not whisking cocoa thoroughly before adding chia seeds
- Using light coconut milk (texture is noticeably thinner)
- Serving at 1 hour instead of 2+ (still too thin)
Storing Tips
- Refrigerator: 5 days in sealed jars — texture firms slightly each day
- Too thick? Stir in 1 tablespoon of coconut milk
- Freezer: 2 months — thaw overnight or enjoy frozen as popsicles
Conclusion
Once you understand that chia seeds are doing the same structural work as cream and gelatin in a traditional mousse, the entire recipe clicks into place. Five ingredients, two stirs, overnight refrigeration — and a dessert that earns genuine compliments. Make this tonight, refrigerate overnight, and share your experience in the comments tomorrow!
FAQs
Q: Why did my mousse come out lumpy?
A: You skipped the second stir. Chia seeds settle and cluster in the first 5 minutes. The second stir at exactly 5 minutes redistributes them before the gel sets. If your mousse is already refrigerating and you notice lumps, remove from the fridge and stir again if it’s been less than 30 minutes.
Q: Can I use white chia seeds instead of black?
A: Yes — the gelling properties are identical. White chia seeds create a slightly speckled appearance in the dark mousse; black chia seeds are invisible. Nutritionally equivalent.
Q: How do I make a thicker, firmer mousse?
A: Add 1 extra tablespoon of chia seeds (5 total per 1.5 cups liquid) and refrigerate overnight. For maximum firmness, use full-fat canned coconut milk and refrigerate 10–12 hours.
Q: Can I add alcohol to this for an adult version?
A: Yes — add 2 tablespoons of Kahlúa, Baileys, or dark rum to the base mixture. Alcohol slightly inhibits gelling, so add an extra half-tablespoon of chia seeds to compensate. Refrigerate overnight for best results.
Q: Why is my mousse grainy?
A: The cocoa powder wasn’t fully dissolved before adding chia seeds. For grainy mousse that’s already set, blend it with an immersion blender — this breaks up both cocoa clumps and chia clusters and creates a completely smooth texture.