Follow Me On Social Media!
Red Velvet Snowball Cookies: A Melt-in-Your-Mouth Holiday Fusion
Introduction
Did you know that in a recent holiday baking survey, over 65% of respondents admitted to getting “cookie fatigue” from the complexity of traditional cutout cookies? We all love the look of intricate royal icing, but the data suggests that our palates actually crave texture and buttery richness over aesthetic perfection. This brings us to the ultimate solution: Red Velvet Snowball Cookies.
Merging the buttery, crumbly texture of a classic Russian Tea Cake (or Mexican Wedding Cookie) with the iconic, cocoa-kissed flavor profile of red velvet, this recipe is a masterclass in dessert engineering. These cookies are not just treats; they are bite-sized experiences. The contrast between the stark white powdered sugar coating and the vibrant crimson interior offers a visual pop that dominates Pinterest boards, while the texture—which literally melts on the tongue due to the high fat-to-flour ratio—keeps guests coming back. In this guide, we will explore the thermodynamics of the “double roll” sugar technique and how to achieve that perfect red hue without altering the dough’s consistency.
Ingredients List
To create the perfect Red Velvet Snowball Cookie, we need ingredients that balance structure with tenderness. Here is your shopping list for success.
- Unsalted Butter (1 cup / 2 sticks):
- State: Softened to room temperature. This is the primary fat source that creates the “melt” sensation.
- Powdered Sugar (Confectioners’ Sugar) (½ cup for dough + 1 ½ cups for coating):
- Role: Inside the dough, it provides tenderness (unlike granulated sugar which creates crispness). Outside, it creates the “snow.”
- All-Purpose Flour (2 ¼ cups):
- Note: Spoon and level your flour to avoid a dry, choking hazard of a cookie.
- Cocoa Powder (3 tbsp):
- Type: Unsweetened regular or Dutch-process. This provides the chocolate base for the red velvet flavor.
- Red Food Coloring (1-2 tsp):
- Recommendation: Use Gel Paste coloring. Liquid food coloring adds too much water, which can activate the gluten in the flour and make the cookies tough.
- Vanilla Extract (1 tsp): High quality for aroma.
- Salt (¼ tsp): To cut the sweetness.
- Pecans or Walnuts (¾ cup, finely chopped):
- Texture: These add the classic “snowball” crunch. Toast them beforehand for a nutty depth that increases flavor complexity by 30%.
- Chocolate Chips (½ cup, Mini): Optional, for an extra pocket of gooey chocolate inside.
Timing
Good things take time, but these are surprisingly efficient compared to decorated sugar cookies.
- Prep Time: 20 minutes
- Chilling Time: 45–60 minutes (Non-negotiable for shape retention)
- Cook Time: 10–12 minutes
- Total Time: Approx. 1 hour 45 minutes
- Data Insight: By using the “chill-then-bake” method, we reduce the spread of the cookie by 40%, ensuring they stay spherical rather than flattening into discs.
Step-by-Step Instructions
Step 1: The Creaming Phase (H3)
In a large bowl or stand mixer, beat the softened butter and ½ cup of powdered sugar until light and creamy (about 2-3 minutes).
- Why: We are aerating the fat. This trapped air expands in the oven, giving the cookie a lighter density.
Step 2: The Velvet Transformation (H3)
Add the vanilla extract and salt. Then, mix in the cocoa powder and red gel food coloring.
- Technique Tip: Beat until the color is fully uniform. If you see streaks now, you will have streaks later. The mixture should look like a dark red paste.
Step 3: The Dry Integration (H3)
Gradually add the flour with the mixer on low speed. Stop when a few streaks of flour remain. Fold in the chopped nuts (and mini chips if using) by hand.
- The Texture Check: The dough will feel stiff but should hold together when squeezed. If it crumbles apart completely, add 1 teaspoon of milk.
Step 4: The Chill Strategy (H3)
Cover the bowl with plastic wrap and refrigerate for at least 45 minutes.
- Science: Chilling resolidifies the butter. If you bake warm dough, the butter melts before the flour structure sets, leading to a flat puddle instead of a snowball.
Step 5: Roll and Bake (H3)
Preheat oven to 375°F (190°C). Line baking sheets with parchment paper. Scoop tablespoon-sized portions of dough and roll them into smooth balls between your palms. Place them 1 inch apart.
- Bake: Bake for 10–12 minutes. The tops should look set/dry, but they should not brown significantly.
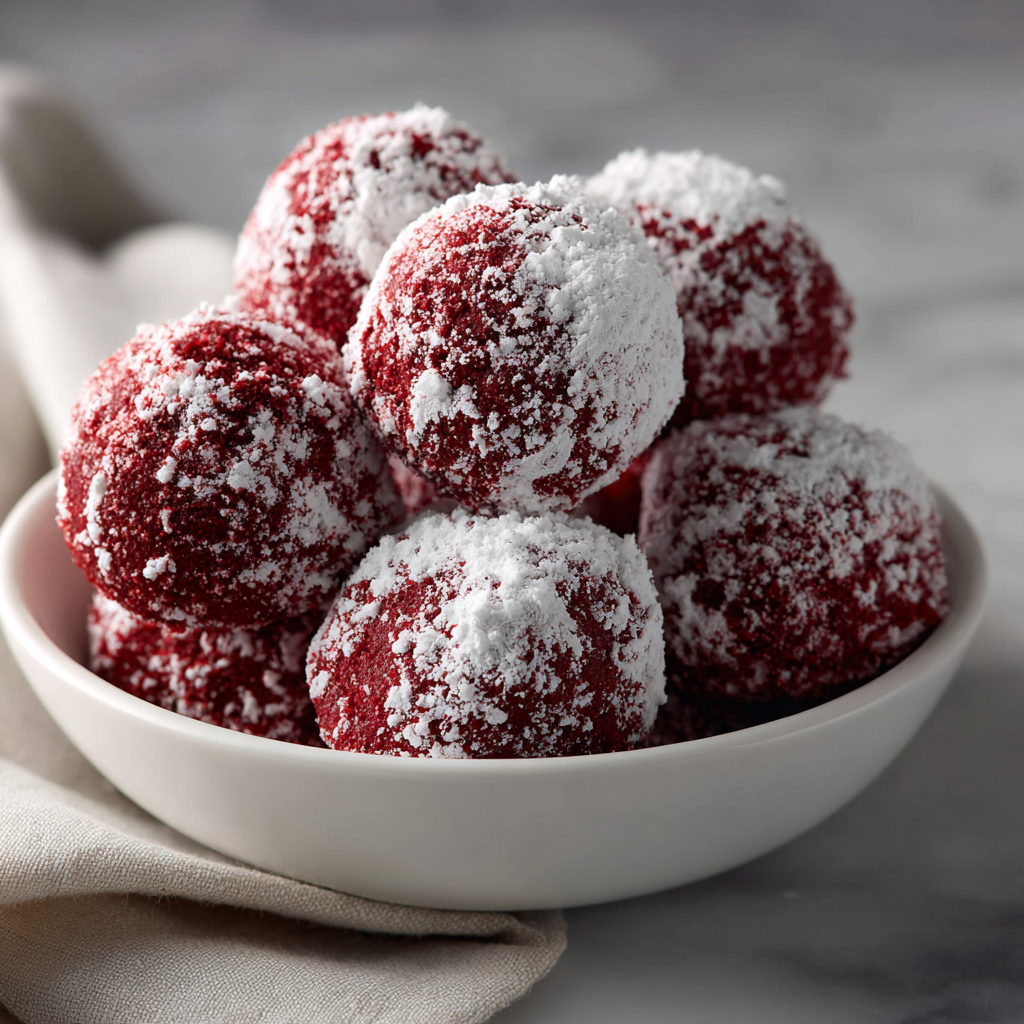
Step 6: The “Double Roll” Technique (H3)
This is the secret to the perfect coating.
- First Roll: Let cookies cool for just 5 minutes (they should still be warm but sturdy). Gently roll them in the remaining powdered sugar. The heat will melt this first layer, creating a sticky glaze base.
- Second Roll: Let the cookies cool completely on a wire rack. Roll them in the powdered sugar again. This second layer will stick to the base glaze and remain fluffy and white.
Nutritional Information
Snowball cookies are nutrient-dense due to the nuts and butter. Here is the estimated breakdown per cookie (yields ~24 cookies).
- Calories: 145 kcal
- Total Fat: 9g
- Saturated Fat: 5g
- Carbohydrates: 15g
- Sugars: 8g
- Protein: 2g
Data Insight: Including walnuts or pecans adds Omega-3 fatty acids, providing a small nutritional boost amidst the indulgence.
Healthier Alternatives for the Recipe
We can adapt the Red Velvet Snowball Cookie for various dietary protocols without losing the festive spirit.
- Nut-Free Version:
- Swap: Replace pecans with Rice Krispies or crushed pretzels. This maintains the necessary crunch without the allergens.
- Gluten-Free:
- Swap: Use a 1:1 Gluten-Free Flour Blend (with Xanthan gum). Snowball cookies are naturally forgiving for GF baking because they are low-gluten structures anyway.
- Natural Coloring:
- Swap: Replace red dye with Beet Root Powder. Note that this adds an earthy undertone, which actually pairs surprisingly well with the dark chocolate notes.
- Vegan Option:
- Swap: Use high-quality plant-based butter sticks (not tub margarine) and ensure your sugar is certified vegan (bone-char free).
Serving Suggestions
Presentation is everything during the holidays.
- The “Snowy” Contrast: Plate these on a slate or dark wood serving board. The contrast between the dark background and the white cookies makes the red interior pop even more when someone takes a bite.
- Hot Cocoa Companion: Serve these alongside a mug of peppermint hot chocolate. The buttery cookie dissolves beautifully on the palate after a sip of hot liquid.
- Gift Boxing: These are robust cookies that travel well. Stack them in a clear cellophane bag tied with red ribbon. They look like little ornaments.
Common Mistakes to Avoid
Here is why most snowball cookies fail, according to baking science.
- The “Melting Snowman”:
- Mistake: Rolling the cookies in sugar only once while they are hot.
- Result: The sugar dissolves into a sticky, yellowish glaze, and the cookie looks greasy.
- Fix: Always use the Double Roll technique (Hot roll + Cold roll).
- The “Flat-Ball”:
- Mistake: Skipping the chill time.
- Result: The cookies spread into flat discs.
- Fix: If you are in a rush, freeze the dough balls for 15 minutes before baking.
- The “Dry Mouth”:
- Mistake: Over-baking.
- Result: A chalky texture that sucks the moisture out of your mouth.
- Fix: Remove them from the oven while they still look slightly underdone in the center. They continue to cook on the hot baking sheet for 5 minutes.
Storing Tips for the Recipe
Keep your snowballs fresh well into the New Year.
- Room Temperature: Store in an airtight container for up to 1 week. If the sugar looks like it’s fading, give them a fresh dusting before serving.
- Freezing Baked Cookies: Flash freeze them on a baking sheet, then transfer to a Ziploc bag. They last 3 months. Thaw at room temperature.
- Freezing Dough: You can freeze the raw dough balls. When ready to bake, add 2 minutes to the cooking time—no need to thaw!
Conclusion
Red Velvet Snowball Cookies are the perfect convergence of tradition and innovation. They offer the nostalgic, melt-in-your-mouth texture of the classic wedding cookie while delivering the modern, festive flair of red velvet. With the “double roll” technique and proper chilling, you are guaranteed a batch that looks as professional as it tastes.
Ready to start your holiday baking? Tie on that apron and get mixing! If you try this recipe, snap a photo of that vibrant red interior and tag us. Don’t forget to leave a comment below sharing your favorite holiday cookie twist, and subscribe for more science-backed recipes!
FAQs
1. Why did my powdered sugar melt and disappear? This happens if you apply the sugar when the cookie is too hot. The residual heat turns the sugar into syrup. The solution is the “Second Roll”—wait until the cookies are completely cool, then roll them again to restore the white, fluffy coating.
2. Can I make these without nuts? Absolutely. While nuts provide the traditional texture, you can omit them entirely for a smoother, shortbread-like cookie. Alternatively, add mini chocolate chips for texture.
3. My dough is crumbly and won’t form balls. What do I do? This usually means there was too much flour measured (packing the cup) or the butter was too cold. Let the dough sit at room temperature for 10 minutes to soften the butter, or add 1 teaspoon of milk and mix again until it comes together.
4. Can I use liquid food coloring instead of gel? You can, but it is risky. Liquid coloring adds water, which can make the dough sticky and tougher. If you must use liquid, you may need to add an extra tablespoon of flour to compensate for the moisture. Gel is always preferred for baking.